Sunday, August 25, 2013

Meet the Teacher night

I was so overwhelmed by the difference of meet the teacher night at my new school. At previous schools I've been in, I get to meet all the parents, but they come in slow increments, and I usually didn't have more than 2 sets of families in my room at one time. 
Well, this year, I probably had EVERYONE in my room at the same time! And then I had my switch class come in to meet me too. These students brought all their school supplies, so the room was filling up of students trying to sort their items. I have been used to students bringing their supplies on the first day of school, this was a change!

 I lined up boxes and put labels on the wall for the things that I was going to collect, like: glue, paper, scissors, pencils, crayons, markers, pens, tissue, sanitizer and ziplocks. 
Students chose their desk by writing their name on it with permanent marker (it comes off with static gaurd spray, or nail polish remover) They left their personal items at their desk (notebooks, binders, pencil boxes, folders)

I set up a computer in the room with my email open. Parents simply typed in their email information into a new contact. This way, I didn't have to take the time to make new contacts on my own, and I also didn't have to go through the process of trying to read the handwriting and get the email correct!

Overall, this year's meet the teacher night was a success. I met most of my students and their parents, and I am looking forward to starting a new school year ;) 

Saturday, August 17, 2013

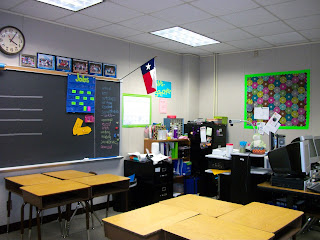
My new classroom...in progress

I started my career in Atlanta, Georgia as a 3rd grade teacher. My classroom was decorated with hand-me-downs from retired teachers and garage sales--I made it work. 2 years later, my husband got a job promotion and we moved to North Carolina. I taught 3rd grade again for 3 years there. 
THEN, since my husband is so awesome at his job, he was promoted again within his company and we moved to Houston, Texas.
I will be teaching 4th grade Language Arts and Social Studies this year! Starting a new school, new state, new curriculum, new grade and new subject area specialty is already posing to be a challenge, and I don't have my students yet! 
As I began to unpack my school boxes from the move and hang things on the wall, I felt I was getting a lot accomplished. THEN, I walked down the hall and saw all my new coworkers' classrooms. Let's just say, they a;; are awesome, have a theme, and are MUCH more complete than mine. I decided that after 5 years of hand-me-down posters, decorations and supplies that I should make a theme for my room. I went with lime green, blue and a hint of pink. All my favorite colors, and I already had many things these colors anyway :)
This is my guided reading center. I took 2 trapezoid tables and combined them to make my version of a kidney table. On the side wall I will have my CAFE board for the Daily5 (which is all packed with my house belongings)

A view of my teacher corner. 
I framed all my previous classes and hung them on the wall using command strip picture hangers (basically strong velcro). My calendar, schedule, and jobs chart is all located here. 

I bought fabric at Hobby Lobby to go with my theme and made separate bulletin boards on the walls for each subject I teach. 

On my cabinet doors I will display my word wall and student work samples. 

My reading nook. Most of my books are still packed in a storage unit waiting to be shipped here from NC, so it looks quite bare right now. 

NEW Carpet! I have had carpet squares since I went to college and had them in my dorm room. I took them to my classrooms and they were great. 
I suggest carpet squares for the classroom because they are easily moved around and conformed into different shapes. Unlike a standard rug that must stay the shape it came in. 
HOWEVER, after almost a decade of carting these squares around the country they were filthy! I sent them to the land of trash and bought a simple rectangle rug. 
I picked out a few square that were still presentable and put them in my reading nook. 


I saw this idea on pinterest. Last year I taped fake flowers to my pencils to identify them, but they always got destroyed within days. Duct tape is easier to put on, and comes in so many cute colors :)

Grade, Copy, File trays in my teacher area to help organize papers.


Kids were always taking my chair behind the guided reading table. My classroom this year had a bigger chair for the teacher, so I put my mark on it with ribbon. No one can take it now :)

Texas flag in my room! 

I have had this tool box since I started teaching. This year I finally decided to label the drawers. 
I made several text boxes in WORD the same size as the front of the drawer. Then, I put the label on the inside of the drawer with double sided tape. 

My communication station. Here I will put extra handouts, permission slips, book orders, newsletters etc. Hopefully this will eliminate the need to make extra copies of something when a student looses it, and eliminate wasting paper. 


My check in board. I have an entire blog post about this, look for it!


Friday, August 16, 2013

Check in chart


For classroom management and keeping track on where all my students are at, I adapted this idea from pinterest to fit my classroom. At my new school students have to make a lunch choice each day. So I created this version of my check in chart to display their lunch choice each day. 
When students arrive in the morning they move their numbered magnet to their lunch choice, this also shows me that they are present for the day. Throughout the day when students leave the room for bathroom, nurse, ESL, or specialist they move their magnet to that space. This way I know at any given time where my students are. When they return their move their magnet back to their lunch choice. 

To create this I used a metal cookie sheet, and fun duct tape to divide the sections. I found that in my old version the poster tape didn't stick very well. 
NEW VERSION


OLD VERSION
ought round magnets from the craft store and wrote on them with a metallic sharpie marker. I thought about all the reasons a student would have to leave the classroom throughout the day and made labels for them. 
I taped this to the wall next to the door with permanent poster tape. It stayed up all year, and was actually so well stuck that it was hard to get off  at the end of the year :)


when a students arrives in the morning, they find their class number, and move it to "PRESENT" so I can easily take attendance. 
Then, when they leave the room throughout the day, they move their number to the corresponding box. So at anytime if I'm trying to figure out where they are, I just have to look at this tray and see where they are at :)

FYI: When making this I found that hot glue and regular glue does not stick well to the cookie sheet and it will pull off easily!!


Communication Board

I saw an idea similar to this online, and decided to adapt it to my classroom. This is my communication station which is located at the front door to my classroom. Below this I have their mailbox to have all papers returned and sent home, as well as the place to turn in their assignments. The goal of this is to eliminate "Extra" papers from floating around or being tossed out, only to need to be copied again (like permission slips and important notices).
I used those ancient antique things called "transparency paper" to create pockets on the board. I simply stapled the bottom flat, and then angled the sides in so that it created a pocket.

This could be done with file folders or paper, but I wanted to be able to see through it. There are clear folders out there you can buy, but I had these in my stash already (free) :) 


Friday, August 9, 2013

Teaching line graphs

I noticed that my students have a really difficult time understanding line graphs and how to read them. I decided to have us track the temperature in the morning and in the afternoon and display it on a line graph. After each month we looked at it to determine trends in the temperature. 
Students realized that the morning temperature was always colder than the afternoon. 
As winter cam, the line graph gradually overall went down, and as spring came, the temperature went up overall. 
When the temperature was about the same in the morning and afternoon we inferred that is was raining or cloudy that day, which caused the temperature not to change much throughout the day. 
 As we finished a page in classroom, I moved it to the hallway so we could experience the change over a long period of time.
By doing this, I didn't have to spend a week or more teaching line graphs, instead it was authentic instruction and application throughout the year that students were constantly exposed to. 

March "Multiplication" Madness

During March Madness this year to get our 3rd grade students motivated to learn their multiplication facts we took time to have a tournament! 


1. Each classroom had their own tournaments to send "representatives" to the real tournament. 
2. 32 total students from the grade level went to the overall challenge. 
3. We randomly put the student's names on bracket.
4. When it was their turn, they came forward and answered multiplication facts as fast as they could. For the first round, the first student to get 2 out of 3 correct and the fasted moved on to the next round. 
The second round was 4 of 7
Third round was 6 of 11
final 4 was 8 of 15
 AND the final championship was 11of 20.

 ALL students from the grade gathered in the cafeteria to watch their classmates compete for the title :)

Meet the Teacher

Teaching in a "not so privileged" area, parents asked me to prioritize the items on the district supply list. For meet the teacher night I complied all the items from the list that we literally used EVERYDAY to encourage parents to purchase these items above all others on their list. For those that hadn't yet gone shopping, this was a great visual for them to spend the least amount of money on the necessities for the school year. 


Behavior Stick

At my school we are departmentalized: meaning another teacher and I partner together to share two classes throughout the day. The challenge was keeping the behavior consistent between us. After much collaboration and agreement, we decided, along with our entire grade level to create the behavior stick. 
Each student had their name and class umber on a clothe pin. We painted a yard stick (less than $1 from Home Depot) with the 3 colors that are in our class agendas corresponding to behavior. I we had to do it again, we would add at least 2 more colors for behavior. 
This stick was carried by the students from class to class, to lunch, recess, specials and the bathroom. Everywhere we went we had "the stick." Throughout the year all I had to do was look at the stick, walk over to it or hold it up for students to understand that I am expecting rules to be followed. 
Since all of my grade level used the stick, any teacher knew what to do with it. As well as the specialists and any random person in the hallway. It was an easy concept for substitutes to grasp making it easier to manage behavior when I had to be absent. 


Classroom Pencil Wreath

I saw many different types of pencil and crayon wreaths online and steps to creating it, but I didn't like just pencils or just crayons. SO, I decided to add the two together. I also like the look of a diagonal wispy wreath, so I added that concept here also. 


 Materials needed: glue gun and glue sticks
pencils
crayons
cardboard circle (can be found at any craft store)
ribbon to hang it
optional corkboard circle
something to display your name
 I started by dividing the circle into parts step by step, first fourths,
 then eighths, 
 until I got to 32, I just kept cutting each half in half. 
 Then (optional) to create the diagonal effect, I connected the top of one line with the bottom of the neighboring line.
 Then, I glued a pencil on top of each diagonal line. 
 I glued crayons on top of every other pencil. I chose to put them in rainbow order, but you can put them randomly if you like. 


 I then put a ribbon to hang it
On top of that I glued a cork board circle on top, printed my name and pinned it to the cork.

I hope you can use these easy steps to create your own wreath for your classroom this year. Also makes a great gift for a teacher! Think teacher appreciation week, Christmas, Valentines Day, or just because you love your child's teacher :)

Random Crafts

After my husband accepted a company promotion, we sold our first home in North Carolina, packed everything and moved to Houston, Texas. All my crafts, decorations and supplies are still in storage until we set some roots in our new location. These are some images of crafts I created for home decor in our previous home. When we get our things out of storage and moved into a new home, I can create detailed "how to" blogs for each craft. 

These were all images I created to send to family members to show them how we made our new house a home. 


Teachers Pay Teachers

I decided at the beginning of the year to post my teacher created resources online to sell. It took a lot of time to make them pretty, detailed, and error free to sell, but finally I have posted some and made money off things that I use in my personal classroom anyway. Of course all this money goes back into my classroom, as any teacher can relate to :)
This year I have moved from North Carolina teaching 3rd grade Math and Science, to TEXAS teaching 4th grade ELA. This will be a big change this year for me, but it will mean a lot of new personal, unique resources that I get to offer on my TPT store. 
Since most of the country has moved to Common Core State Standards, I still intend to make sure my resources align with it, even though Texas has not adopted it. 

Check it out:
Teachers Pay Teachers

Dirty Thirty "Roaring 20s themed Party"

My husband turned 30 this year, and I wanted to make a party for him that was over the top! This was my chance to go crazy with craft and entertainment ideas. I chose to theme the party "Roaring 20s" to "Say goodbye to his 20s." 
Invitations were sent out to our friends in the mail. I got this invitation made by someone on ETSY. I just had it printed as a photo at a local printing stop.  

etsy shop: http://www.etsy.com/shop/mtipsy


Everyone was encouraged to dress in 20s attire, of course not everyone did, but that's okay :) Because it was a surprise for my husband, I packed him a bag with clothes in it, and sent him on a boys day out while I prepared for the party. When he got dressed he thought the theme was either "Boardwalk Empire," or "Michael Jackson." :)


I designed a cake to look like a die. My friend Kristin made it for me. She used strawberry and confetti cake mixes, and buttermilk icing. The dots were created with editable paper from the craft store in the cake decorating section.  


I "googled" 20s slang words so I could make the food tags themed. 


I made flapper headbands for the girls attending the party. I took stretchy sequined ribbon and hot glued it big enough to fit around my head.
Then, I hot glued feathers to one part of it. I made several of these with different colors for my guests to chose what they wanted to wear. 

Of course, my dog had to also become a flapper herself :) 

I made my necklaces by simply stringing beads longer than normal. 

I used etching paint to create these personalized glasses as party gifts. 
For details on how I made these glasses, see my post : etched glasses. 


Using black contact paper, I cut out the letters and stuck them to the stairs in the entryway.